The video below shows you a few exercises that you can make to prevent carpal tunnel syndrome. They’re quite simple and they involve stretching the wrist or the hand.
The video below shows you a few exercises that you can make to prevent carpal tunnel syndrome. They’re quite simple and they involve stretching the wrist or the hand.

 Lulu.com is a site that allows you to publish and sell your own books. I’m talking about paper based books here, not eBooks. It’s pretty simple actually. You upload the manuscript or the photos to their site, you use their tools to format the book the way you want it and you’re done. You can order just one book for you to have or you can sell it in their marketplace. You can even get your own ISBN and publish it in book stores from other countries (if it’s good enough).

I’ll give you one example. I have a small manuscript (150 pages) written by my grandfather that I want turned into a real book, as a gift for my mother. I upload the file to the site, design the covers and I have two options that I need to choose from.
Here are the two variants that I want to choose from and the prices/book:
Paperback, with Standard paper, Black & White, A5 size, Perfect Bound binding, 150 pages – it will cost me $7.50 per book for a 10 books order.
Hardcover, with Standard paper, Black & White, US Trade size, Casewrap binding, 150 pages – it will cost me $20 per book for a 5 book order.
As you can see, you can go for the cheap paperback or for the better looking hardcover. If you order at least 25 books, the price goes down. Instead of $7.50, the paperback from my example would cost $6.10 per book for an order of at least 25 books.

GOG (Good Old Games) is a place where you can buy legally, old games, at prices smaller than $10. For this money you get a game that is DRM free and XP & Vista compatible, that you can install and play as many times as you like.
Some of the games that you can buy:
If you’re feeling nostalgic and you want to play some of the games of your youth, this is the site to visit.

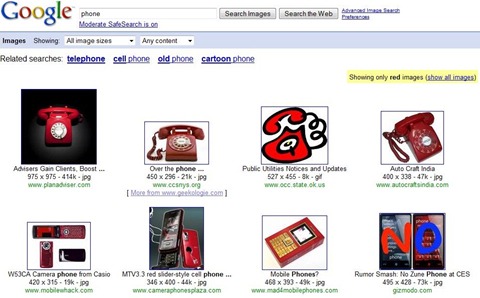
A new option implemented in Google Image Search is the ability to restrict the results to images that contain a certain color in them. You can’t select this option directly, but you can modify the URL of the search results to get it.
For example, the url below is for the “phone” search with the red attribute attached to the URL, and the result can be seen in the image below:
http://images.google.com/images?q=phone&imgcolor=red
These are the colors that can be used in the URL: Black, Blue, Brown, Gray, Green, Orange, Pink, Purple, Red, Teal, White, Yellow.

If you want to take a screnshot in Windows, you have a couple of options at your disposal. First, you can use the built-in function, using Shift+Print Scrn to take a screenshot of the screen. If you want to take a screenshot of just the current window, use Alt+Print Scrn. Next, paste the image in another program, like Paint.
If you’re using Windows Vista or Windows 7, you have a tool at your disposal, the Snipping Tool.
There are also a number of other options at your disposal.
![]() Using a browser extension – I recommend the FireShot add-on, which has versions both for Firefox and Internet Explorer.
Using a browser extension – I recommend the FireShot add-on, which has versions both for Firefox and Internet Explorer.
Using screenshot software

 Microsoft decided to cut down a bit on the number of Windows 7 editions that they will be releasing. With Vista that was a bit of an issue, as buyers had no clue which one to choose from the many options that were available.
Only three different variants of Windows 7 will be launched though and you can see the details about them below:
Windows 7 Home Premium has the same features as Vista Home Premium had, coming with Windows Media Center, Aero interface, handwriting, multi touch and DVD playback.
Windows 7 Professional has the features that a Vista business installation would have. Besides the features of the Home Premium version, the Professional will also have group policy based management tools, joining Windows domains, network based backup features, Remote Desktop host capabilities and Encrypting file system support.
Windows 7 Ultimate is the best version out of the three. Besides the features that Professional has, it will also come with:
In either case, the feature set includes everything in Professional edition plus support for BitLocker whole-drive encryption (and the new BitLocker To Go feature, which adds high-grade encryption to removable media). This edition also includes all supported language packs (those cost extra for other editions) and the capability to boot from a VHD.
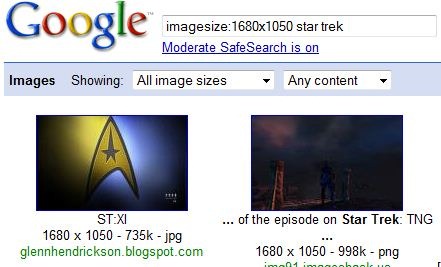
A little known Google Images command that allows you to find images of a certain size is imagesize.
You can use the command in the following form:
imagesize:1680×1050 keyword
Replace 1680×1050 with the size you want and use the keyword you need. An example is in the screenshot below.

It’s a very useful command, especially for those with wide LCD screens, since most wallpapers are offered in normal format.

Windows 7 comes with a number of new keyboard shortcuts, but there are a few of them that I especially like.
If you want to use at least some of these Windows 7 shortcuts on Windows XP or Vista, read this article from Lifehacker.
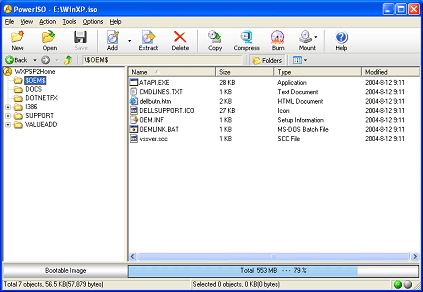
Not every piece of software that works on Windows XP or Vista will work on Windows 7. Mounting ISO files can be particularly difficult if you’ve been using Daemon Tools to do it so far.
Until Daemon Tools shows up with a version that will work on Windows 7, you can use PowerISO to mount ISO, nrg, mdf and a few other types of image files. PowerISO is freeware so there shouldn’t be any problem. Its only limitations is the screen that asks you to register it and a limit of 300Mb when creating or editing files. Mounting files doesn’t come with limitations however.
Update: there is now a Daemon Tools version that works on Windows 7.

Now, while Daemon Tools or PowerISO is a decent choice if you want to mount ISO files on Windows 7, they’re not the only options. Instead of going with the old favorites, you might want to try something new. If that’s the case, I’ll suggest using Virtual CloneDrive.

In order to use this software, download it from their site first. Once you get past the installation process, you will be able to use the mount ISO option without any other delays. There is no restart required on Windows 7 for this utility to work, like there is for other ISO mounting programs.
All you will have to do is double click on a ISO file and it will be mounted and ready to use. An alternative would be to right-click on the file, go to the “Open with” menu and select the option to mount the file.
If you want to mount ISO on Windows 8, it’s a much easier task to do in this version of the Microsoft operating system, than it was in the past. You had to install a software to do that previously, but with this version the ISO mounting is done by Windows itself. It can do that from the get go, without any special setup. All you have to do is select the mount ISO on Windows 8 option and you will have access to the files on the image immediately. Here’s how you can do that.
First of all, go to the directory where you have your ISO file. Once you’re there, right click on the file you want to mount, and then select Mount. That’s about it. The ISO is mounted on Windows 8 so you have access to its files.
Another way to do it, is by double clicking on the ISO file, which should give you the option to either Mount, which would make it in a virtual drive, or Burn, which would write it on a DVD or CD.
You’re free to mount as many ISO images as you’d like, so you’re not limited to just one or two. It only took Microsoft about a decade, but they’ve finally decided to mount ISO’s on Windows 8 natively.
